1000 Lumen Trionic LED Front Light

This manual both shows how you attach the light holder and the light on a Walker (left column below) and also how you attach them on a Veloped (right column below).

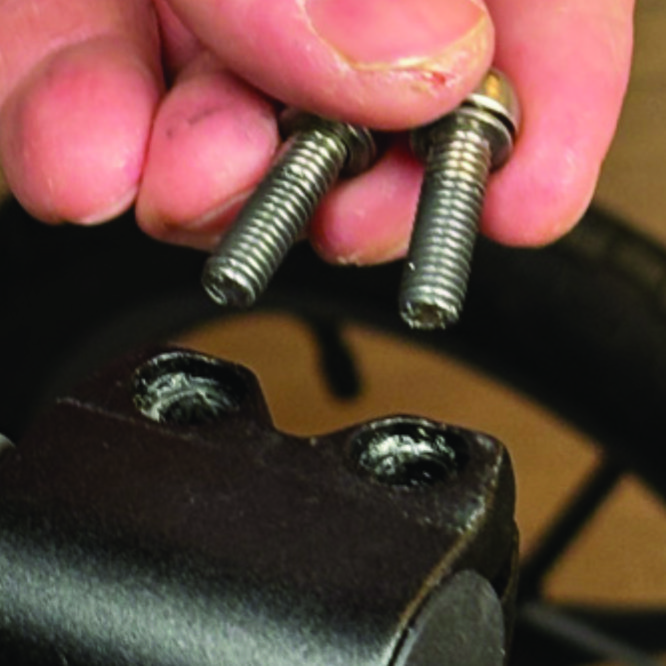
In the left-hand photo, A shows the holder attachment parts for a Walker (2 screws + 2 washers). B shows the holder attachment parts for a Veloped (1 screw + 1 knurled nut + 1 nut).

1000 Lumen Trionic LED Front Light

Attaching the Light Holder

Instructions for a Walker

On top of the black semi-vertical tube, locate the two screws that clamp the grip tube, situated in front of the brake lever.
A1. On top of the black semi-vertical tube, locate the two screws that clamp the grip tube, situated in front of the brake lever.
Loosen both screws with the 5mm allen key included with the LED light.
A2. Loosen both screws with the 5mm allen key included with the LED light.
Remove the two screws from the grip clamp.
A3. Remove the two screws from the grip clamp.
Place the light holder on top of the grip clamp, with its circular and slotted light attachment pointing forwards and upwards. Enter the two screws with washers into the holes of the clamp.
A4. Place the light holder on top of the grip clamp, with its circular and slotted light attachment pointing forwards and upwards. Enter the two screws with washers into the holes of the clamp.
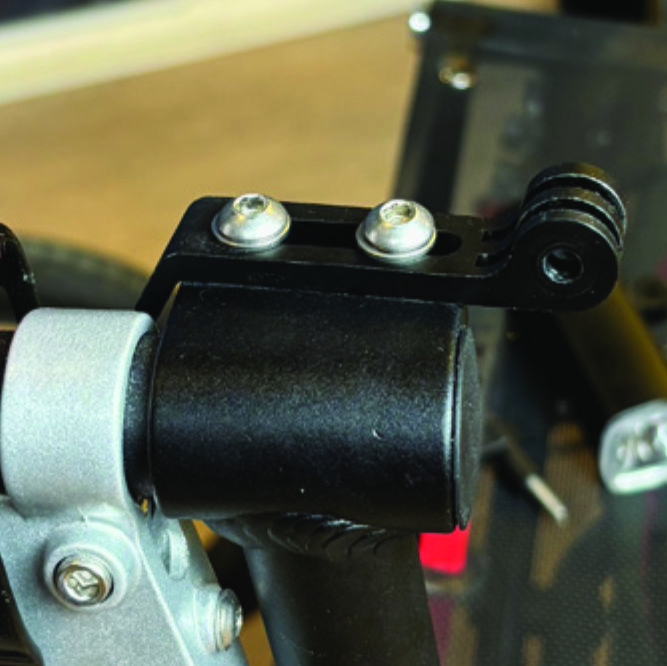
Tighten the two screws with the 5mm allen key. NOTE: It is important that you tighten the screws properly as they secure the grip tube with its rubber grip and brake lever.
A5. Tighten the two screws with the 5mm allen key. NOTE: It is important that you tighten the screws properly as they secure the grip tube with its rubber grip and brake lever.

Instructions for a Veloped

Locate the screw at the center folding hinge of the U-shaped grip bar of the Veloped. Unscrew the screw with the included 4mm allen key and remove it.
A1. Locate the screw at the center folding hinge of the U-shaped grip bar of the Veloped. Unscrew the screw with the included 4mm allen key and remove it.
Replace the old screw with the longer screw included with the LED light. Attach the longer screw to the hinge and tighten it with the 4mm allen key.
B2. Replace the old screw with the longer screw included with the LED light. Attach the longer screw to the hinge and tighten it with the 4mm allen key.
Attach the short angled end of the light holder to the lower end of the screw, on the downside of the U-shaped grip bar. The holder should point downwards. Fasten the holder with one washer and the knurled nut that you tighten with your fingers.
B3. Attach the short angled end of the light holder to the lower end of the screw, on the downside of the U-shaped grip bar. The holder should point downwards. Fasten the holder with one washer and the knurled nut that you tighten with your fingers.
For a more secure holder attachment, avoiding the holder to unintentionally turn sideways, replace the knurled nut with the included stainless steel nut and tighten it with a 10mm spanner.
B4. For a more secure holder attachment, avoiding the holder to unintentionally turn sideways, replace the knurled nut with the included stainless steel nut and tighten it with a 10mm spanner.
This photo shows the light holder as correctly attached.
B5. This photo shows the light holder as correctly attached.

Attaching the LED Light to the Holder

Instructions for a Walker

Identify the circular front end of the light holder, with two slots for attaching the light.
A6. Identify the circular front end of the light holder, with two slots for attaching the light.
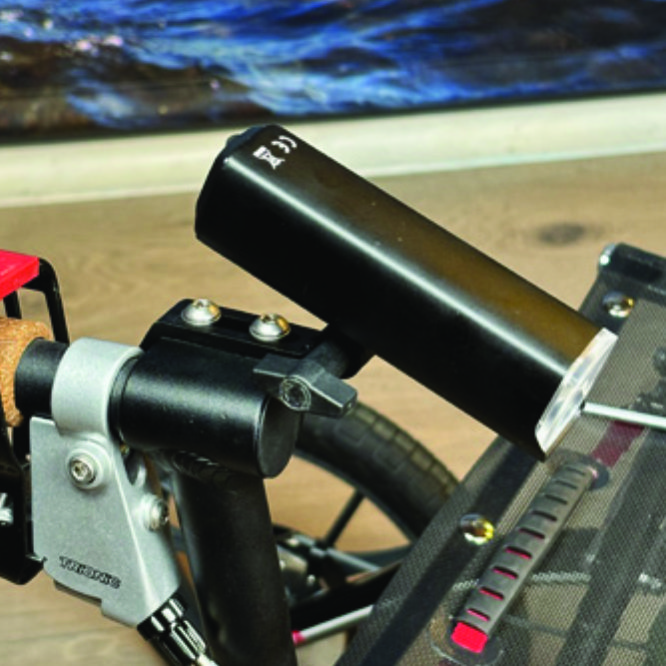
Push the slotted bracket of the light into the slots of the holder and make sure they are aligned. Seen in the traveling direction of the Walker, enter the included wingnut from the left and tighten it.
A7. Push the slotted bracket of the light into the slots of the holder and make sure they are aligned. Seen in the traveling direction of the Walker, enter the included wingnut from the left and tighten it.

Instructions for a Veloped

Locate the screw at the center folding hinge of the U-shaped grip bar of the Veloped. Unscrew the screw with the included 4mm allen key and remove it.
B6. Locate the screw at the center folding hinge of the U-shaped grip bar of the Veloped. Unscrew the screw with the included 4mm allen key and remove it.
Identify the circular front end of the light holder, with two slots for attaching the light.
B7. Identify the circular front end of the light holder, with two slots for attaching the light.

Instructions for Use

Overview

Caution

Caution

Battery Performance

Battery performance is significantly affected by temperature variations: •Low Temperature: At 0°C, capacity decreases by 5–10%, reducing operation time by 50%. At -20°C, capacity drops by 30%, potentially shortening operation time by 70%. Performance returns to normal when the temperature rises to 20°C. •Self-Discharge Rate: At room temperature, the battery loses about 1% of its capacity per day. When stored at 40°C, the self-discharge rate increases, leading to a loss of approximately 5% of capacity per day. To maintain optimal battery performance, avoid exposing it to extreme temperatures and store it in a cool, dry place. If you do not use the battery for a long time be sure to recharge the battery every 3 months.

Safe Mode

When the battery is low, the light will automatically switch to a 50-lumen high-beam safe mode, providing an additional 30 minutes of operation.

How to operate the light

Press and hold the switch for 2 seconds to turn the light on or off. Click once to cycle through modes, and double-click to enable ultra-bright mode (1000 lm).

The package contains

Charging And Powerbank

Product Reviews    

  • I am very pleased with it.…

    I recently bought a Walker 12er, and after using it for several weeks I can tell you that I am very pleased with it. The walker feels so much more stable than my previous one and is certainly more comfortable to use due to the large wheels with the i…

  • Great walker…

    I bought this walker for my mother. Since we live in the countryside, it is easy to find yourself walking on uneven ground. In these moments, her wrists always hurt a lot. Now thanks to the Veloped this is no longer the case. Dirt roads and forest pa…

  • Great customer service, great product…

    From customer service to delivery this company is 'fantastic'
    The walker has made such a massive difference to my mums mobility.
    She is walking upright and no longer complains of pain in her back and knees.
    She is much more confident and is managi…

  • My Veloped has improved my quality of life unbelievably!…

    Probably a little too early for a full review yet as I have only had my 14” medium nearly two weeks but already it has accompanied me on a two day mountain First Aid Course at Plas-y-Brenin in North Wales where it behaved impeccably clambering over b…

  • Mrs V Potts…

    I purchased this for my husband, but he will not use it, don't know why as he hardly walks anywhere as he is not very steady on his feet. Having said that I keep thinking I will make use of it myself. At the moment I have only moved it a short way, b…

  • Glad I have it!…

    Not needed to use it yet but glad I have it…

    CST Inner Tube 14 inch
    by Carolyn MacLean
  • Brilliant!…

    The Veloped Sport is an absolutely brilliant machine which has completely changed my life.
    I had another make of four wheeled walker, which was not comfortable to use and if I hit a small obstacle it felt as though I would go over the top of it.
    No…

  • Finally – no more stumbling!…

    Hello, Trionic!
    Back issues (spinal stenos) since many years back that strongly affected my musculoskeletal system, led to me finally making the decision to get a walker. Found Trionic's webpage online. Okay, this was certainly something I had to tr…

  • lovely bit of kit, Pity i couldn't make use of it,…

    I couldn't change direction and reverse it out of my (narrow)hallway as the wheels were touching both walls at the same time…

Subscribe to our newsletter!